41. More Tool Improvements

This week I didn’t spend a ton of time on the game, nor did I add anything flashy. However, I did take some of the things that I learned last week while improving the puzzle panel editor GUI and used them to redesign the editor for my custom animation system.

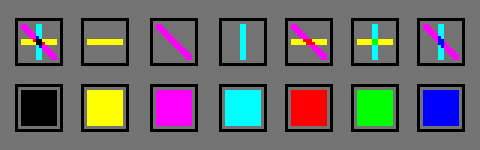
This was the previous system, which involved using several separate components. Both a master Sprite Animation component, and an additional Sprite Animation Strip component for each individual animation:

animationsystem.png

Although this certainly worked. It was pretty cumbersome to add new animations or tell what you’re looking at. As you can see, the first Sprite Animation component simply has a flat array references to the other Sprite Animation Strip components. Unfortunately, it is impossible to tell the difference between each animation in the list, because all the duplicate components have the same name. Not to mention, having a bunch of separate components wastes vertical space on irrelevant information, and overall… it’s just a mess.

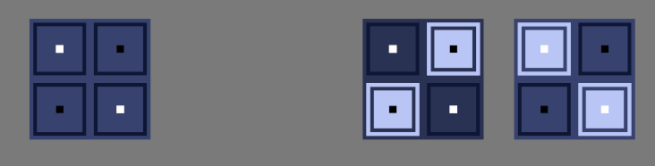
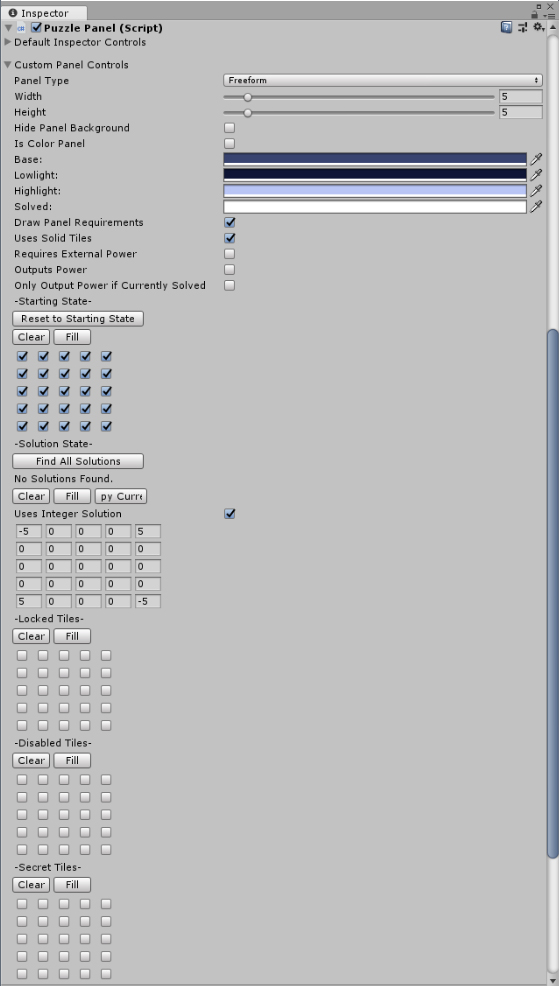
Here’s the redesigned interface:

newanimationeditor.PNG

Although it is almost functionally identical to the previous system (in fact, this is the same set of animations), you can see that there are a number of usability improvements here. For one thing, each animation gets its own name, this makes things way more readable.

Now, you might ask, why even go through the trouble of writing your own animation system when you could just use the built-in Unity animation system, which surely supports way more that this.

I prefer as much as possible for the code to be doing the heavy lifting on things like this, so the Unity GUI editor and data-driven approach just doesn’t appeal to me. Additionally, although the Unity system is fully featured; for a 2D sprite-based game, it’s just overkill. I’m not doing animation blending, so thinking about the animation as a tree is a strange way to think about it. Essentially, a 2D animation is just a flipbook of frames. That can be represented as a 1D array both in the code and in the interface. If I give each of these arrays an index, this makes it super easy to change an animation from within the code. There’s no need to for me to create a FSM with a state change graph and all that when I could just set an animation index. If I want to change which animation is currently playing. I can just do this:

playerAnimation.index = 0; //Or the index of the animation that I want

And the animation component will just change over to the new animation and continue handling the playback.

Now, it is perhaps a bit cumbersome if I want to think about things in terms of the names of the animations, as the code is not particularly illuminating on this front, but that can either be handled by just adding a comment to the code, or by creating a lookup that maps from the name to the index.

Either way, it just works better for me.

Additionally, as with the Puzzle Panel editor, reducing the overall complexity on both the editor end and the code end leaves me with much more room to add, without having an overwhelming amount of unnecessary complexity. For the time being, the only frame animation in the game is the player’s walking animations (which need to be redone), so I don’t really need more functionality than this.

That may also mean that this was a misappropriation of my limited time to work on the game, but time will tell.

40. Tool Improvements

After making the changes to the “dice face” puzzles which I described in a previous blog post, I ended up with a few edge case puzzles which didn’t work under the new mechanic, but were still within the boundary of the game’s subject matter. This meant that I would need to do some extra engineering to keep these puzzles working the same way. This caused me to confront some of the growing problems with my puzzle design tool.

Here’s a screenshot of the old interface:

oldpuzzleinteface

This is the tool that I use to design all of the puzzles in Taiji. Although it has been perfectly serviceable, it was starting to take up a bunch of vertical space, and there are additionally a bunch of very subtle details which were starting to make it icky to work with on a regular basis. Additionally, if I want to add more functionality (which I do), it was becoming very unclear how I was going to add it, both in the interface, and the underlying code.

So I have done a bunch of under-the-hood work, which although completely invisible to players, allows me to clean up the code andrevise the puzzle designer interface.

This is how it looks now:

newpuzzleinteface

Although also somewhat complex, it actually has more functionality than the interface shown above, while taking up a bit less space. (Admittedly, these aren’t the same puzzle, so it’s not a 1:1 comparison, but I don’t really want to take the extra time to grab a better screenshot right now.

There are still some more improvements that I’d like to make, including basic ones like making sure all the input boxes still line up when there are disabled tiles on the panel, but overall I am much happier with the interface and the underlying structure of the code going forward, and I think it will definitely be more amenable to adding new functionality.

38. Small Tweaks

colordiceSeems like I’m writing these things on Mondays most of the time now…

Didn’t get a whole lot done over the weekend, at least not visibly. Most of the work was under the hood or maintenance. I repaired the puzzles which mix the “dice” and “dot” mechanics, after having changed the way the dice mechanics work. The combined puzzle sequence stills need a lot of work to be enjoyable to solve, but at least the puzzles aren’t actively broken anymore.

I got them working again through a small change to how puzzle solutions are validated. Previously, with the dot mechanic, whenever the color of two dots needed to be checked, the code would use an arbitrary number which specified which color dot we were talking about. (i.e. 60 = blue dot, 61 = yellow dot, 62 = red dot, etc.) The change I decided to make is to have it actually directly compare the color values of the two symbols in question. (Technically I compare an integer hash of the color to avoid the == operator overhead of Unity’s built-in color class) Directly comparing colors has a couple benefits when it comes to simplifying the code and also makes future puzzle possibilities much easier.

I didn’t end up revamping the entire puzzle panel system, because after some further investigation, there are some good reasons that I architected it the way that I did, in spite of the fact that it’s unwieldy at times. The main reason is that I’m relying on the Unity serialization system to save the panel layouts, and certain data formats just serialize more straightforwardly and quickly. One dimensional data type arrays are the most easily serializable format. So, even though it would be more useful to have a single tile structure which stores all the relevant data, including references to spawned GameObjects at runtime, it is a bit more challenging to implement than it would immediately seem.

Furthermore, serialization can get real nasty when dealing with null references, as stated on this page in the Unity docs:

Consider how many allocations are made when deserializing a MonoBehaviour that uses the following script.

class Test : MonoBehaviour
{
    public Trouble t;
}
[Serializable]
class Trouble
{
   public Trouble t1;
   public Trouble t2;
   public Trouble t3;
}

It wouldn’t be strange to expect one allocation: That of the Test object. It also wouldn’t be strange to expect two allocations: One for the Test object and one for a Trouble object.

However, Unity actually makes more than a thousand allocations. The serializer does not support null. If it serializes an object, and a field is null, Unity instantiates a new object of that type, and serializes that. Obviously this could lead to infinite cycles, so there is a depth limit of seven levels. At that point Unity stops serializing fields that have types of custom classes, structs, lists, or arrays.

Since so many of Unity’s subsystems build on top of the serialization system, this unexpectedly large serialization stream for the Test MonoBehaviour causes all these subsystems to perform more slowly than necessary.

I may yet return to make some more of those changes, but you can see that the water is fraught with peril. A good approach would probably be to have two formats, one for all of the runtime code, and one that is used for serialization, but this would also create a bunch of potentially slow startup code every time the game was run in order to translate between the data formats (and there’s already more initialization code for the panels than I really want there to be)

On a humorous note, before some of the changes I made, I had this monstrosity of a line of code:

symbol = litSquares[p.x+width*p.y].GetComponent().transform.GetChild(1).gameObject.GetComponent();

And now, with some data restructuring and a few helper aliases, it becomes the much more manageable:

symbol = tiles[p.x+width*p.y].symbols[0]

36. Starting Area Improvements and Colorblind-Safe Colors

A bit late on this post, but hey! Better late than never.

This weekend, I streamed some work on improving the starting area. Managed to get in a few non-trivial puzzles to cap off the area a bit better and introduce the concept of locked tiles. Locked tiles are just tiles that you cannot toggle from their starting state. Here’s a screenshot of those new puzzles ( a bit low quality cause I snapped it from the stream video):

startingareaclimaxscreen

I also changed the game from an oblique renderer back to an orthographic one. This is a bit of a subtle technical detail, but suffice to say that the change simplifies some graphical things and makes some others more complex.

I had hoped to do the first full art pass on one of the game’s areas, but unfortunately I ran into a bug with Unity’s tile-mapping system. I upgraded to 2018.1 in an attempt to fix it, but I have since been told by Unity Support that the bug is not fixed until 2018.2b, so I will either have to upgrade to the latest beta version, or wait until it gets a full release to hopefully get started on that.

Colorblind Safety

In last week’s devlog post, I talked a bit about some of my thoughts relating to accessibility, particularly when it comes to deaf players. This week I’ve been thinking more about colorblindness.

Trying to come up with a set of color-blind friendly color options is quite difficult as there are several different forms of the condition. Some people have a hard time telling between red and green, and others between blue and green, and a rare few cannot distinguish colors at all.

I tried a few different variants, but many of them had problems:

colorblindsafe_no.jpg

The absolute best way to deal with colorblindness, of course, is to just use different symbols instead of different colors. This unfortunately is not a straightforward option for Taiji, as differently shaped symbols have different mechanical meanings. You can also use patterns instead of colors, but since the game uses pixel art, the detail possibilities are very limited.

Luckily, since most people can tell the difference between blue and yellow, those colors in combination with black and white provide a 4 color setup that will work for most people and most puzzles, at least where the only thing that matters is telling the colors apart.

safecolorcombos2
A mock-up panel with the latest color blind “safe” color palette.

However, this may still not be enough for some players, so I’ve decided to address this issue with a two pronged approach. For most puzzles in the game, I will just stick to the “safe” color palette, and the game should be accessible to many players by default. However I will have an additional assistance menu where the player can choose alternate colors if the defaults are not easily distinguished.

Additionally, there will be a set of completely color-free assistance symbols which can be enabled. These will be useful for puzzles where the player needs to know exactly which color they are looking at, or for when more than 4 colors are necessary.

Here’s my first pass at that:

colorblindcolormixingsymbols.png
Assistance symbols across top, corresponding full colors across bottom.. Colors from left to right: Black, Yellow, Magenta, Cyan, Red, Green, Blue.

Of course, the symbols themselves are subject to change, but the important thing is that the symbols combine and mix the same way that colored light does in the real world. In this case, the color model is subtractive.

For clarification on what I mean, here are the symbols again, now colored with their corresponding colors:

colormixingsymbols_colored.png

I’m not certain this will work for all the puzzles in the game, but it’s a start and it’s fun to think about.

29. Animation Nation

The past two weekends, I have been working on revising the design and animations of the main character. The old sprite has served prototyping fine, but it’s time to start working on actual art for some parts of the game, both so that I can start designing puzzles that use more subtle visual cues, as well as for the purposes of being able to promote the game at all. (Prototype grey-box environments can be fun to play around in, but don’t show very well)

Part of this process involved deciding on an approach for implementing the animations into the game. Unity already has a very robust and complex animation system built in to it, but it is much too complex for what I need for a simple 2D pixel art game. Unity’s animation system is built for handling complex motion blending and IK with 3D models. Also, it doesn’t really allow for easy control of animation switching from code. You have to establish all your animation parameters and transitions in the Animation FSM through the Animator panel.

So, I set about coming up with a quick and dirty replacement which would basically allow me to, in code, just say “play this animation now”. This took way longer than it should have, primarily because I couldn’t get a custom inspector for my new “Sprite Animation” component to display the information that I wanted correctly. Eventually I threw in the towel and just divided the system into two component types. One “Sprite Animation Strip” component is added for each individual animation, and there is a master “Sprite Animation” component which handles playing the animations and switching between strips.

animationsystem

It’s pretty messy, primarily because there’s no clear indication of which animation strip is which when you’re looking at the array under the Sprite Animation component. Because of this confusion, it’s not a particularly tenable system if you have dozens of animations, but for the time being it has served my purposes fine.

Here’s a gif of the current work-in-progress walking animation in action (the environment is still just grey boxes though:

firstpasswalkinganim.gif

There’s a lot of room for improvement. Most notably, I need to fix the hair so that it is always blowing in the same direction. To do this, I’ll probably make the hair a separate sprite which gets overlaid over the main one.  Also she shouldn’t suddenly get a haircut when she is walking, but it is a good start.

Oh, and here’s a bonus gif of just the standing animations on top of a more detailed background.

NewPlayer_Standing

25. Testing

So, as I mentioned in the previous post, I spent last weekend sending out a build of the game to several testers. Because the game is starting to get a bit large, I decided to cut out a couple of the areas which will be in the full game in order to focus the demo only on things that have changed.

What was left took most testers around 2 hours to play through, although some finished more puzzles than others. I’m uncertain how much additional playtime the removed areas would be, but I believe what was tested is a substantial portion of what’s in the game at the moment, so I wouldn’t expect it to add more than another half hour or so.

That’s obviously not really indicative of the final playtime of the game, as things will probably change and some areas will be expanded or reduced in certain ways. I’m a bit ambivalent about the length of the game, as the game is both intended to be “as long as possible” and “wasting as little time as possible.” I’m not entirely certain that it’s not entirely wasted time free, as there is still a lot of traversal time, especially for players who want to leave areas and return to them later. That’s certainly a problem that I hope to solve before shipping a final version of the game, probably by allowing players to warp in/out of each area.

Across all 5 testers, all puzzles were solved at least twice, so that’s some good evidence that the game is at least not totally off in cat hair moustache land. I’d like for people to have a hard time with at least some puzzles in the game, but at the moment there were really only two puzzles which totally stumped people. Not to say that the puzzles were easy, some players would easily spend 10 minutes on some panels. But I would like there to be quite a few more puzzles in the final game that cause people to pack their bags and go home without solving them, as long as they’re good puzzles.

For the most part, most of the things in the game are working the way they should be working. There weren’t many catastrophic failures, but I did have an issue crop up that I’m not entirely certain how to deal with.

Dice Conundrums

(The following could be considered to contain minor mechanics spoilers for puzzles in the game. I don’t describe how the mechanic works in detail or show any puzzle solutions, however.)

One of the issues which came up in this round of testing is one which I had already considered for some time, but have been unable to really come up with a proper solution to. And that’s for the puzzles in the “dice face” area.

For reference, the puzzles look like this, where they have tiles which are marked by black or white dots. The color of the dot indicates whether the tile should be on or off. As a player, which of the two answers on the right would you presume to be a correct way to interpret the symbols? Stop for a moment and think…

dicefacepuzzles

If you chose the one on the left, congratulations! You’re correct.

The issue, however, is that many players see the solution on the right as more intuitive. This is not particularly out of the question, as white meaning “turn it on” is quite a natural assumption, and I make use of that assumption elsewhere in the game. It makes sense, but there is an issue. Really, two issues.

Firstly, that when the player solves a puzzle, I light up the panel tiles which were highlighted very bright. In this case, white:

solveddicepanels

The issue should be immediately apparent here. If the correct answer is white on white, that means there is no contrast and we cannot even see the white dots anymore. It is difficult to see the black dots as well, but this could be remedied by choosing a brighter panel background color.

Alright, but I could still solve this issue in one obvious way, which is to make the solved panel color be something other than white, or make the white dot colors be not as bright, both of which are shown below.

solveddicepanelsnotwhite

This is fine a fine solution, apart from my other reason for choosing contrasting colors, which is simply for the aesthetics.

Where are the Dice?

There are puzzles later in this area which have more dots per each tile. The patterns of the dots are the same as those which are found on the faces of dice or dominoes.

domino

Notice something about how dice and dominoes are colored? Notably, they are colored for contrast. Black on white or white on black.

There is another aesthetic consideration when it comes to the coloration, which you will find at the top of this blog, but I’m reproducing below in case I change the blog design later on:

panel_title_img

If I take as a solution to change the solved color or the dot color, we would get the following:taijipanelvariations

Neither of which really look very good or imply what the original means to. This is a somewhat less important point than the previous one about the dice, but I believe it still stands.

Okay, so you may be thinking about one other possibility which I have not thus far entertained. Why not simply outline the white and black dots?

dicepaneloutliningissues

The issue here is, I think, quite apparent. I just don’t really have the pixels to go around to properly outline them. The five white dots on a white background is just a mess and doesn’t read properly as five dots.

Perhaps if I make the individual tiles bigger?

dicefaceoultinedbigger

This solves the readability issue, but my concern now is that it is not very apparent which of the two possibilities is correct simply based on the visual.

Anyway….

I have perhaps rambled about this one point for long enough, but suffice to say it is not a problem that is entirely simple to solve, and I wanted to be clear about how much I have thought about it. I think I have a bit of an idea on how to mitigate the issue with future players, however. As I think a big part of the confusion is the lack of awareness of why they are even that way in the first place. So, I will try priming players with the idea of dice before they enter the area and this may help them to make that connection.

Even if it doesn’t, I have not had a ton of testers complain about this issue, and I believe I have at least two other minor changes that can be easily made to reduce confusion in the area.

24. I’d Appreciate Input

I’ve been extra busy the past two weeks prepping a build for testing, so I unfortunately forgot last week to write a post about what I’ve been doing.

It’s been around 8 months since the last test build that I did, and just testing out the new interface would’ve perhaps been enough, but instead I decided to make some changes, both to the existing areas as well as putting in a first draft of an area for the dot mechanic.

I made a list of tasks that I wanted to accomplish for this specific test build, and set about doing those a bit more diligently. I’d say this is generally a good idea if you want to ship anything: to set out the bullet-points that you need to hit and focus your efforts there. Unfortunately, I still took longer than I expected and didn’t get all of the things on the list done, primarily because I kept subdividing and expanding the tasks.

One of those tasks was to provide a basic tutorial at the start of the game, essentially just a readout with the controls floating in the area near where the player first starts. The issue there is that in order to show the proper controls I need to know if the player is using the mouse/keyboard controls or a gamepad, and it was surprisingly difficult to get this type of information with the input system that I was using.

That system was what I think was a pretty standard system built with the default Unity input system. I had inputs with labels like “Run Button” and “Toggle” and those were mapped to different actions in the game, and different buttons and keys. Unity doesn’t really support automatically remapping these inputs to a bunch of different controller types however, so I had to make a system on top of that where I would have a “XB” and “PS4” version of each input label and then just use some string concatenation to build the proper input strings at runtime based on the name of the input device (which unity thankfully does let me access). But by the time the inputs got to my code, I couldn’t tell whether or not they were coming from a controller or not, as both the XB and PS4 versions of inputs were doubly mapped to keyboard controls as well.

So, I decided to rip out and replace the entire input system in order to get that functionality, as well as to simplify the whole thing for any future input complexities.

In Unity, there’s really only so much you can do without just writing an external dll and handling the input at the OS level (which I may still consider doing). It seemed like the simplest and most straightforward thing to do was to get all of the raw input data that I can out of Unity’s system and then handle the rest entirely in C# code.

The way this worked out in practice was pretty straightforward for the buttons, as unity will just let me poll the event system and has keycodes for all joystick button numbers. With the axes however, I needed to set up input types in the Unity editor just to be able to collect them. I named the inputs “joystick 1 axis 0” through “joystick 1 axis 9”, and set them each to get the axis that matched their name. Although it’s a bit janky, with some string concatenation I now can get all the input info pretty easily into the scripting layer of Unity.

So, once I have all this input data, I need to know what to do with it. In a similar way to the previous input system, I get the name of the controller from Unity and compare it against known strings for each controller type (Xbox 360 or PS4, at the moment, as that’s what I have to test). If I find a controller matching that type, then I set the button mapping for a virtual controller (sort of a platonic ideal of an xbox 360 gamepad) to be equivalent to some pre-mapped structures which simply store the relationship between say, the A button, and a numbered button for that actual controller according to the Unity input system.

I also store another virtual controller for the PC inputs, but here there’s not really an input map. I simply hard map certain keyboard keys to the equivalent buttons. The mouse is stored separately, as it doesn’t exactly correspond to a controller input.

Additionally, whenever I poll each input (whether it be a keyboard press or a button), I update a variable which says where the last input came from,. This is then used to update the final virtual controller state that the game sees. I can also use it later to tell which virtual controller the latest input came from.

Perhaps it’s a bit difficult to explain, but I’ll try to diagram it below:

inputsystemdiagram2.png

Overall, I am pretty happy with the results, and it solved the problem of knowing whether or not the player is currently using a controller or the PC controls. However, I still have some old virtual controller management code sitting on top of all of this that I would like to eliminate before I call this system completely rebuilt.

I plan on writing another post this week on some of my thoughts about the testing feedback, but for now I think I will leave it at that. 🙂

Oh, and here’s what the current controls readout looks like in game:03-20-17_20-10-10-1010.png

21. Dots, Recursion, Optimization, and More?

This week, I spent some more time designing puzzles for the “dot” mechanic that I mentioned in the previous blog post. I currently have about 60 puzzles sitting around in the world using this mechanic. Definitely take that number with a grain of salt as these are rough draft quality puzzles, and I will probably cut a bunch of them.

02-20-17_23-08-19-819
“The dot mechanic”: these are some intermediate puzzles.

Still, it’s been fun designing these puzzles and seeing how much I can wring out of just the baseline, without even including the other mechanics of the game. There is a lot of depth and subtlety, and I really think I probably have just scratched the surface what’s there.

In addition to building out this area, I created a functional prototype of an area that I’d been thinking about before I even started building the game (at least as far back as June 23, 2015, which is the modified date on an old Google Doc where I wrote the idea down). I wasn’t really sure how this area would work at all because the concept was a bit strange, but it actually seems to work well and I am happy with how that is going. Unfortunately, to tell you what the concept behind the area is would be spoilers, so I will just leave you with a mysterious screenshot.

02-20-17_23-14-24-1424.png
What could it mean?

Brute Force Puzzle-Solving, Optimization

So, another thing that I was thinking about for a while, and in particular with regards to designing the dot puzzles, is that it is sometimes difficult for me when designing puzzles to figure out if they have degenerate solutions. By which I mean, I usually am putting a puzzle in the game because I found that it has an interesting and unique solution, but many times I am unaware that there are alternative solutions which may not be nearly as interesting or require as clever thinking on the part of the player.

To that end, I felt that it would be useful to be able to see all the possible solutions for any given panel. This seemed like it would be fairly easy to implement, as it just means using the computer to go through all the possible states that a given panel could be in and checking to see if the panel is solved in each state and keeping a list of all the solved states. Sadly, it was not as simple as I dreamed.

First, even just the basic task of iterating through all possible states for a panel was difficult to figure out how to accomplish. Ultimately, the solution came via mokesmoe, one of the viewers in my twitch chat. It’s a fairly simple algorithm to implement, but it uses recursion and so is a bit hard to wrap ones brain around. But it works and it covers teh whole possibility space once, and only once.

Still, when it came time to test it out, it very quickly became apparent that it was not going to be practical past a very small panel size. Mathematically, this is pretty easy to figure out, as the number of possible states grows exponentially with the increase in panel size, doubling for each new tile that is added. Even a 5×5 panel was enough to lock up Unity completely to the point that after a few minutes, Unity’s built-in crash reporter killed the process and offered for me to report a bug to their developers.

I shouldn’t have been too surprised though. Even though a 5×5 panel seems small, there are 33,554,432 (2^(5*5)) possible configurations that it can be in. If you do anything 33.5 million times then it’s gonna take some time. For example, if each solution validation only took half a millisecond, covering everything would take 4 and a half hours of processing time. (Someone else can double-check my math on that)

So, I set out about trying to optimize the code, both in the coverage code, and in the solution validation code. Sadly, it was a bit difficult to profile what was happening because the Unity profiler and recursion don’t seem to mix very well. Lots of killing Unity.exe from task manager ensued.

Eventually, by pulling some variables out of inner loops and reducing the amount of dynamic memory allocations, I was able to get solution validation down to where it takes less than .05 milliseconds.

Still, although this makes the brute-force solver much more practical, this doesn’t prevent the possibility that some panels will just go into what is basically an infinite loop. So, as an additional precaution, I just added a timeout which will kill the solution search after a certain number of cycles and just consider it “un-brute-forceable.” This basically is just a cheat so that I don’t have to worry about Unity hanging. (Although I still seem to have a problem with some puzzles hanging anyway, so it’s perhaps possible that I’m not doing a thorough enough check (maybe I should just check recursion depth too?)).

Anyway, it was fun to do some optimization work there, but I think mostly I’m still being bitten by both the limits of current technology (we don’t have quantum desktop computers yet), and the limits of high level languages (I don’t really think it should be as slow as 0.05 ms per solution validation on a 5×5 grid, even with the fancy recursive solution validator I have for some of the mechanics)


19. Finalizing Up the New Interface

First, I’d like to notify anyone who is following the blog that I have recently been streaming development of the game over on twitch, so follow the channel there and ask to be notified when it goes live. If you missed the stream, you can find a complete archive of all the development streams on my YouTube channel.

So, at the time of the last entry, I was struck with the problem of resolving the ambiguity between the point-and-click type panels and the walk-around type panels, in that they looked pretty much the same. I was also considering abandoning the point-and-click interface as a solution.

This week, I did some more iteration on the artwork for the snake panels, and I’ve reached something that I’m pretty happy with, overall.

Primarily, It is clearly distinguishable from the point-and-click panels. But it also solves a lot of the other small issues that the panels had: The start tiles are clearly elevated compared to the other tiles, and for panels where the player can start on any tile, the startable tiles subtly depress and show a small highlight, encouraging the player to press a button to activate the panel.

newsnakepuzzledesign.gif

I did some other cool interface readability work, but I won’t post it here because spoilers!

The Nitty Gritty Stuff

Mostly though, this week has been technical work.

I did some general performance optimizations when it comes to the panels. They weren’t running terribly, but it seemed like a good time to clean up a lot of the code because I am close to finished with the new interface and know what I need to keep around. Also, there were just some dead wrong things I was doing with regards to solution validation on panels that were eating up CPU cycles. One of them was a bit of a “how did this ever work?” type issue.

Another nice to have feature, which really doesn’t impact the player’s experience much, is Unity’ live script reloading feature. I had broken it at some point for the puzzle panels, and I took the time to investigate why and fix the problem. It was relatively simple, with the only real issue being that I was storing some gameObject references using multi-dimensional arrays, and (amazingly) Unity does not serialize multi-dim arrays.. In order to fix that, I just replaced the multi-dimensional arrays with single dimensional ones and just use [x+width*y] every time I want to access them. I’m still not super happy with this solution, but it at least got the script reloading working.

There was a minor additional snag when trying to get the script reloading working. Which is that even though it was actually working, I couldn’t tell because part of my code didn’t think the panels were visible on-screen and was disabling them (premature optimization bites me again!) The issue here was again just serialization, although most of the panel was getting serialized properly, the bounding box structures that I use to determine visibility were still getting destroyed on script reloads, so all the panels would fail the visiblity check on script reload. Oops!

The rest of the work that I did this week was just about ensuring that all of the existing puzzles are still solvable using the new interface paradigm. There are currently 138 puzzles in the game, which may not seem like a lot, but it’s enough that it can be a bit hard to remember what features all of them do or didn’t use.

As of now, there are only two more small things on the list to implement and the game will be fully playable again, which is great.

Only major bummer is that I have a cold, and I have to go back to my day job in three days.

8. Optimizing Panels

This week I did some nice polishing work on the panels in order to make them look nicer. I also switched the game from an orthographic camera to oblique rendering. If you have no idea what that is, essentially it means that the game is in 3 dimensions, with the third dimension simply being represented as an offset on the first two. It’s the method that most 2D top-down games use to render their art, although usually it’s not actually computationally represented as 3D objects.

The nice thing about moving to oblique rendering is that you can put 3D objects in the scene and they “just work.” I really only switched because for the snake panels I wanted to do an effect which looked like this, where the individual tiles popped up and down:

snake_puzzle_protoanimbig

There is a problem with doing this in a completely 2D method, because then you need to worry about sorting of the individual tiles. Although this is not a particularly complicated problem, it just seemed easier for me to switch to an oblique rendering mode and make each tile literally pop up on the Z axis.

I may regress on this decision at some point, but really there’s no downside to rendering with this method, as if you keep everything on the same z plane, it’s exactly the same as 2D. The main issue that kept me from going to this method earlier was a weird sorting bug, which I eventually tracked down to the fact that my multi-pass rendering method (which I use to get smooth sub-pixel motion that preserves the sharpness of pixel art) was set up to use a render texture without a depth-buffer.

But as for the actual 3d objects part of it for this particular effect, I may change my mind, as I want to have tiles both on the floor and on walls, and due to the way the projection works, the tiles on the wall would need to be rotated along the Z axis to properly be drawn, which would require changing the way the panels work somewhat. Either way, it shouldn’t be too much work to switch it over.

Here’s a (poorly compressed) clip of the results. I think it’s pretty close to the above mock-up:


Optimization

The only downside to doing this polish work is that I ended up adding a lot of fancy interpolation and additional detail objects to the tiles on the panels, which resulted in some performance issues. The game got down to running around 20fps on my (reasonably good) desktop PC.

So, I decided to take some time to do an optimization pass on the game. Which was pretty fun. I relied quite heavily on Unity’s built-in profiler tools, which can be very helpful sometimes and not really helpful at all other times. In particular, I’m still having a NullReference issue on script reloads which I am not really sure what to do about yet. I’ll have to build a small test scene to really track that one down.

I won’t go too much into the details of the optimization, but I did want to point out a couple of fun things which I learned.

Color == Color is quite slow in Unity because under the hood it is doing a approximate equality test. So I gained a 10x speedup just by switching to a component-wise test on color equality. I know, I know, you’re not supposed to directly compare floating point values, but in this case I believe it was acceptable as I’m only trying to see if I already set a value or if just changed this frame. You might ask why I didn’t just use a has_changed flag and a setter function. And the answer is somewhat complicated, and mostly has to do with having a lot of state that is not being properly tracked in one place at the moment. Which means I probably need to redo a lot of the panel code to consolidate the state tracking and so something a bit more of a FSM per each tile than what I’m doing.

The other interesting thing was, there was a serious overhead just from the number of active GameObjects I had in the world. (Over 10,000) For active GameObjects, at least those with an attached script, Unity has to call the Update() function on each of them, even if it immediately returns. The optimization here was pretty simple, just disabling panels when they are not on the screen.

Another little bit there that was kinda wierd, I was using Unity’s built-in Bounds object to store the boundaries of both the screen and the panels. Unfortunately, again, accessing Bounds.min and Bounds.max was secretly under the hood doing some computations to figure out those values, as they are not actually stored. And since I was checking each panel each frame to see if it had become visible simply by comparing the bounds, and there are over 200 panels in the game, that was contributing a few milliseconds just by itself. A fairly simple fix again, just cache those values and compare the cached versions rather than using the Bounds object directly.

Perhaps the lesson I’ve learned here is to avoid using the built-in Unity types as much as I can, as they all seem to do unexpected and somewhat computationally expensive things under the hood when you are just attempting to access a value or compare equality. Also, the dangers of overrides.

Anyhoo, a bit of a technical week, as I continue implementation of the new interface system, but hopefully it’s been fun to read about some of those details for some of you. 🙂